


1099 Tax Filing Online: How to File Fast and Accurately
You got a 1099-NEC from a client or two this year, and now you're staring at a blank return wondering what actually needs to happen next. 1099 tax filing online feels straightforward until you realize the IRS Free File tools weren't built for self-employment income, and one wrong entry on Schedule C can trigger a notice months later.
Here's the direct answer: you can file for free through IRS-approved software if your income is simple, but once you're deducting expenses, tracking mileage, or juggling multiple 1099s, a paid e-filing service or a licensed preparer usually saves you money and stress. This guide walks through both paths so you know which one fits your situation before you hit submit.
We'll cover how to pull your 1099-NEC and 1099-K data together, which free filing options actually work for freelancers, when software falls short, and why some independent contractors and small business owners in Orange County and beyond turn to a tax filing service like ours instead of going it alone. By the end, you'll know exactly how to file fast without leaving deductions on the table.
What you need before filing 1099s online
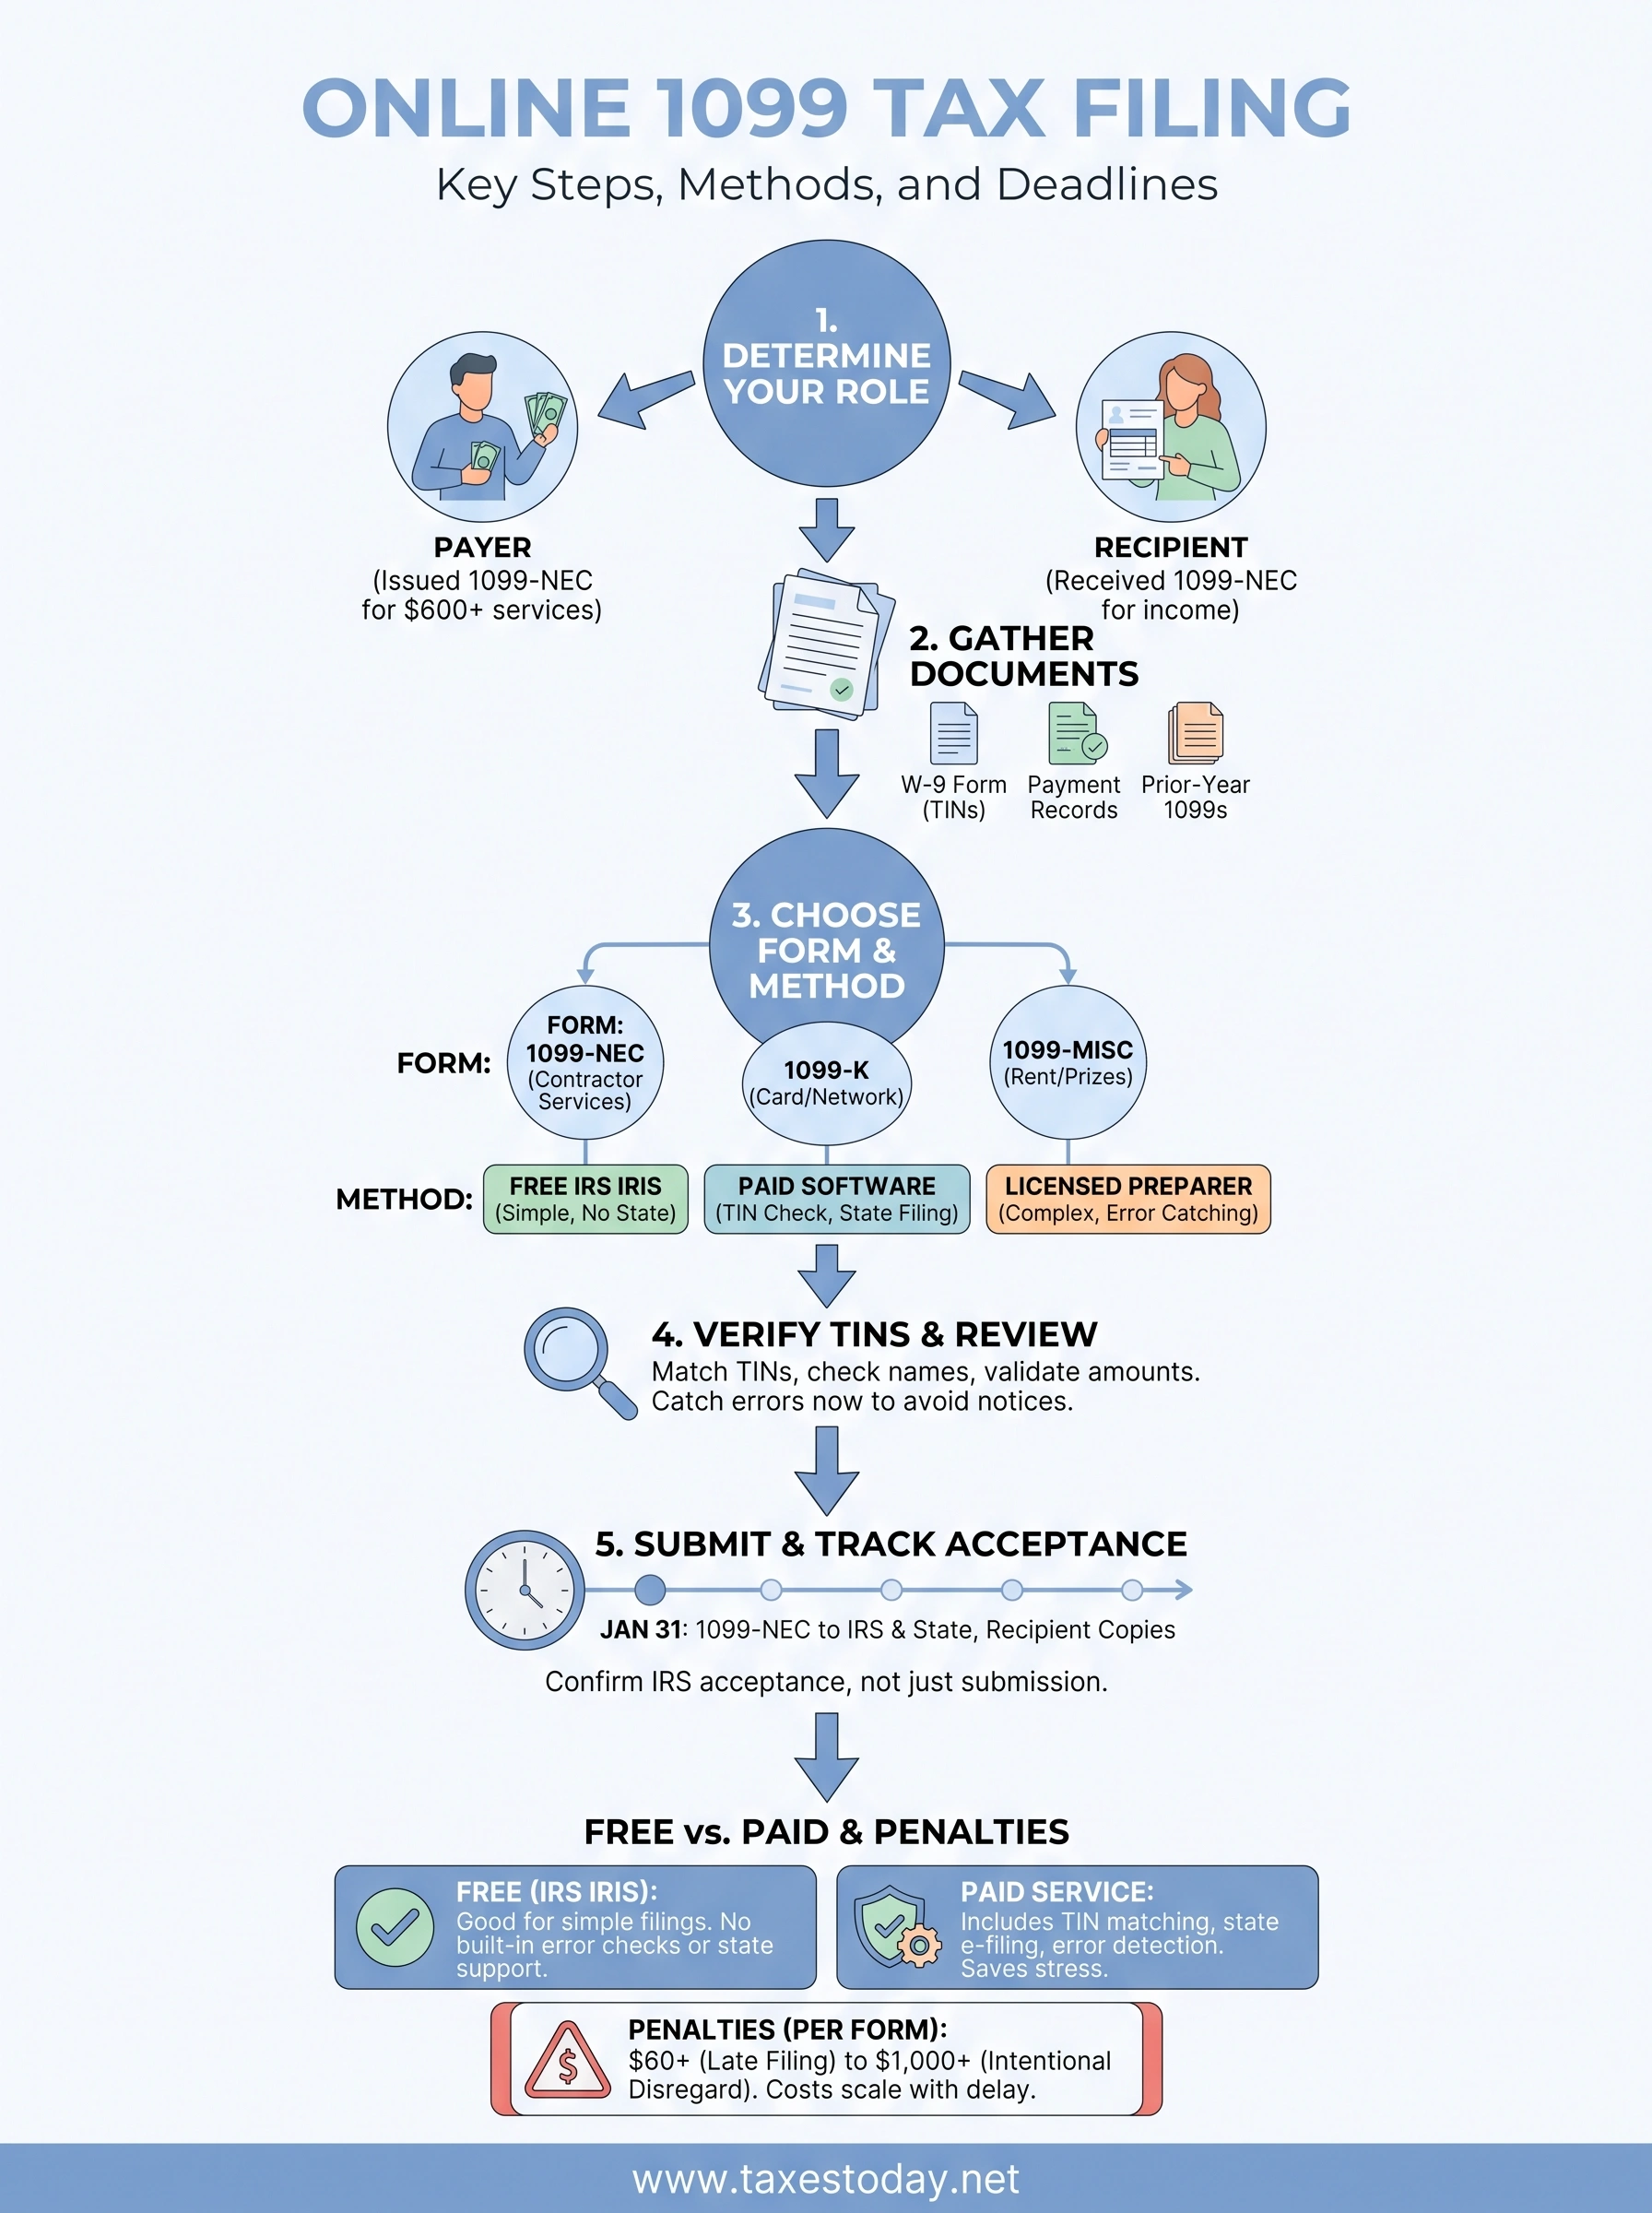
Before you touch any software, figure out which role you're playing this tax season. If a client sent you a 1099-NEC, you're the recipient, and you'll report that income on Schedule C when you file your personal return. If you paid a contractor $600 or more for services, you're the payer, and you're the one responsible for issuing the 1099-NEC and filing it with the IRS. Plenty of small business owners in Orange County end up doing both: they receive 1099s from their own clients and issue them to subcontractors. Knowing which hat you're wearing before you log into a filing platform saves you from entering data in the wrong place.
Documents and numbers to gather first
Once you know your role, pull together the paperwork before you start typing anything into a filing portal. Missing even one number, like a mismatched Taxpayer Identification Number (TIN), is the most common reason e-filed 1099s bounce back or trigger a CP2100 notice later. Here's what you need on hand:
- Your EIN or SSN if you're filing as a payer, or your own SSN if you're the recipient reporting self-employment income
- Completed Form W-9 from every contractor you paid, showing their legal name, address, and TIN
- Total payments made to each contractor for the year, broken out by category (services, rent, legal fees)
- Bank or platform records (Stripe, PayPal, Venmo for Business) showing 1099-K amounts if applicable
- Prior-year 1099s for reference, so totals and formatting stay consistent
- Your state's business registration number, if your state requires separate 1099 reporting
Get every TIN verified before you file. It's the single fastest way to avoid an IRS mismatch notice.
Match your paperwork to the right filing role
Different pieces of information matter depending on whether you're issuing forms or reporting income you received. The table below breaks down what each role actually needs before starting the online filing process.
| If you are the... | You need | Where it comes from |
|---|---|---|
| Payer (issuing 1099-NEC) | Contractor's W-9, payment totals, your EIN | Your own accounting records, contractor onboarding paperwork |
| Recipient (received 1099-NEC) | Copy of the 1099-NEC, expense records for Schedule C | The client who paid you |
| Recipient (received 1099-K) | Copy of the 1099-K, gross transaction totals | Payment processor (PayPal, Square, etc.) |
| Both roles | Prior-year AGI or self-select PIN for e-signature | Last year's tax return |
Pick your filing method before you dive in
Decide upfront whether you're using free tax filing 1099 NEC software through the IRS, a paid e-filing service built for information returns, or a licensed preparer who handles everything for you. Free options work fine for a single, simple 1099 with no deductions to track. But if you're issuing more than a handful of forms, or you're self-employed with mileage, home office expenses, or multiple income streams, a paid service or preparer catches errors free software won't flag. The IRS also requires electronic filing once you're submitting 10 or more information returns total across all types, per the IRS e-file requirements, so larger filers don't really have a choice anyway. Settling this decision now means you won't be halfway through data entry when you realize the tool you picked can't handle your situation.
Step 1. Gather payee information and payment records
Start by building a clean list of every contractor or vendor you paid $600 or more during the year. This step is where most 1099 tax filing online mistakes happen, because a rushed spreadsheet almost always has a typo in a name or address that doesn't match IRS records. Pull your W-9 forms first. If a contractor never sent one, request it now before you file anything, since you legally need their TIN before you can issue a correct form.
A missing or mismatched TIN is the number one reason 1099s get rejected or flagged for a penalty notice.
Reconcile your payment totals
Next, cross-check your accounting software (QuickBooks, Wave, or a simple ledger) against your bank statements to confirm the dollar amount you're reporting for each contractor. Payments made by credit card, debit card, or through third-party networks like PayPal or Venmo for Business don't belong on a 1099-NEC at all. Those go on a 1099-K instead, and the payment processor is responsible for issuing that form, not you. Double-reporting the same payment on both forms is a common error that inflates a contractor's reported income and creates confusion when they file their own return.
Build a payee tracking sheet
Organizing this information in one place before you open any filing software saves you from re-entering data or scrambling for a missing address at the last minute. A simple tracking sheet should include:
- Legal name and business name (if different) for each contractor
- Complete mailing address for the recipient copy
- TIN or SSN from their W-9
- Total payments for the year, broken out by category
- Payment method used (check, direct deposit, platform)
- Any backup withholding applied, if the contractor didn't provide a valid TIN
Flag anything unusual before moving on
Before you move to choosing your filing method, flag any contractor relationship that doesn't fit the standard mold. Payments to attorneys get reported regardless of business structure, even if the attorney operates as a corporation. Rent payments to a landlord who's an individual, not a corporation, also need a 1099. If you paid a contractor through a staffing agency, the agency usually issues the 1099, not you. Sorting these edge cases now, rather than after you've started entering data, keeps your 1099 tax filing service or software session moving instead of stalling out on a form you're not sure applies.
Step 2. Choose the right 1099 form and filing method
Most freelancers assume every payment gets reported on a 1099-NEC, but that's not always true. 1099-NEC covers nonemployee compensation, meaning money you paid a contractor for services. 1099-K covers payments processed through a third-party network like PayPal, Stripe, or Square, and the processor files that one, not you. 1099-MISC still exists for things like rent, prizes, or attorney settlements that don't fit the nonemployee compensation box. Picking the wrong form is one of the fastest ways to get a correction notice, so match the payment to the form before you open any software.
Match your payment type to the correct form
Use this quick reference before you start entering anything into a filing platform:
| Payment type | Correct form | Who files it |
|---|---|---|
| Contractor services, $600+ | 1099-NEC | The business that paid the contractor |
| Card or third-party network payments | 1099-K | The payment processor |
| Rent, attorney fees, prizes | 1099-MISC | The business that made the payment |
| Interest income | 1099-INT | The bank or financial institution |
Pick the wrong form and you're not just filing late, you're filing incorrectly, which means a correction on top of the original.
Weigh your filing method options
Once you know which form applies, decide how you're actually submitting it. The IRS runs the Information Returns Intake System (IRIS), a free portal built for businesses filing 1099s directly, and it works well if you're filing a handful of forms with no complications. Commercial 1099 tax filing software costs more but usually includes built-in TIN matching, error checks, and automatic state filing, which the free IRS tool doesn't offer. A licensed preparer costs the most upfront but catches issues like misclassified workers or missing backup withholding that software simply won't flag.
- IRS IRIS: free, best for straightforward filings with correct TINs already in hand
- Paid 1099 filing service: mid-cost, adds error checks and state e-filing
- Licensed tax preparer: highest cost, best for complex situations or multiple income streams
Check the IRS IRIS platform directly if you're leaning toward the free route, since it lists current system requirements and supported form types before you commit. Whichever method you choose, lock it in now so Step 3 goes smoothly instead of restarting halfway through.
Step 3. Set up your e-filing account
Once you've picked a filing method, the next move is creating the actual account you'll use to submit forms. Whether you're going through IRS IRIS, a commercial 1099 tax filing software platform, or a preparer's client portal, this setup step usually takes longer than people expect because of the identity verification involved. Give yourself at least a day or two of buffer before your deadline, since some accounts don't activate instantly.
Register with IRS IRIS or your chosen platform
If you're going the free route, head to the IRS IRIS platform and create an account using ID.me verification, which requires a photo ID and a live selfie scan. Paid software platforms typically only need an email and business EIN to get started, which is one reason freelancers filing a single 1099 sometimes skip IRIS altogether and go straight to a commercial tool. Either way, use the same legal business name and EIN you'll use on the forms themselves, since a mismatch here creates headaches during submission.
Get your Transmitter Control Code (TCC)
IRIS requires a Transmitter Control Code (TCC) before you can submit anything, and the application can take up to 45 days to process according to the IRS. This is the part that catches people off guard every January. If you're filing 1099-NEC forms with a January 31 deadline, you cannot wait until mid-January to request your TCC.
Apply for your TCC the moment you know you'll be filing, not the week before your forms are due.
Commercial software and licensed preparers already hold their own TCC, so you skip this wait entirely when you file through them.
Confirm your business details are locked in
Before moving to data entry, double-check that your account reflects the correct filing details:
- Legal business name matching your EIN registration
- Current mailing address for IRS correspondence
- Contact email that you actually check during tax season
- Prior-year AGI or self-select PIN, if the platform requires e-signature verification
- Confirmation that your account status shows "active," not "pending"
Handling online tax filing 1099 setup carefully here means Step 4 becomes a matter of typing numbers into fields, not troubleshooting a login issue while your deadline creeps closer.
Step 4. Enter payer and recipient details
With your account active, you're ready to start typing numbers into actual form fields. This is where your prep work from Step 1 pays off, because you're transferring information from your tracking sheet, not hunting for it mid-session. Work through payer information first, then move contractor by contractor through recipient details, since most platforms lock the payer section once you start adding forms.
Enter your payer information first
Your payer profile needs to match your EIN registration exactly, down to punctuation and abbreviations. A business listed as "Smith Consulting LLC" with the IRS won't match if you type "Smith Consulting" into the form. Confirm these fields before adding a single recipient:
- Legal business name exactly as registered with your EIN
- Complete business address, including suite or unit number
- EIN, double-checked digit by digit against your IRS confirmation letter
- Contact phone number the IRS can reach if there's a processing question
A single typo in your payer name can delay every form tied to that account, not just one.
Add each recipient's payment details
Now work through your contractor list one at a time, pulling directly from the W-9s and payment totals you gathered earlier. Enter the recipient's legal name exactly as it appears on their W-9, not a nickname or shortened version you use in your accounting software. For 1099-NEC free tax filing through IRS IRIS, you'll select the form type, enter the TIN, and populate Box 1 with the total nonemployee compensation for the year. If you applied backup withholding because a contractor never provided a valid TIN, that amount goes in a separate box, and skipping it is a common reason forms get flagged later.
Watch for these common data entry mistakes
Rushing through this step causes more rejected forms than any other part of the process. Before moving on, scan your entries for these issues:
| Mistake | Why it matters |
|---|---|
| Name doesn't match TIN records | Triggers a CP2100 notice from the IRS |
| Wrong box for payment type | Misreports income category to the recipient |
| Missing suite/unit number | Delays recipient copy delivery |
| Dollar amount doesn't match your records | Creates a mismatch during IRS matching program |
Save your progress after every few recipients rather than waiting until the entire batch is done. Most platforms time out after a period of inactivity, and losing an hour of data entry over a session timeout is an avoidable headache once you know it's a risk.
Step 5. Validate TINs and review your forms
Before you submit anything, run every TIN through a matching check. This step catches the errors that cause CP2100 notices months down the road, and it's far easier to fix now than after the IRS has already flagged a mismatch. If you're filing through IRS IRIS, the platform runs a basic check automatically, but it won't catch a TIN that's valid yet attached to the wrong name, so don't treat a green checkmark as proof everything's correct.
Run the IRS TIN Matching program separately
Go a step further and use the IRS TIN Matching program directly if you're filing more than a couple of forms. It's a free tool built specifically for payers, and it compares each name and TIN combination against Social Security Administration and IRS records before you file, not after. You need to register separately for this service through the IRS e-Services platform, and approval isn't instant, so build in a few days if you haven't used it before. Running this check on every contractor, even ones you've paid for years, matters because a name change from marriage or a business restructuring can break a match that worked fine last year.
Verify every TIN against IRS records before you submit. A clean match now beats a correction notice in March.
Do a full review pass before submitting
Once your TINs check out, slow down and read through every form one more time. This is your last chance to catch something before it becomes a paper trail with the IRS attached to it. Work through this checklist for each recipient:
- Name matches the W-9 exactly, no abbreviations or nicknames
- TIN matches the IRS TIN Matching result, not just what's typed in the field
- Dollar amount in Box 1 matches your payment records to the cent
- Correct form type selected (1099-NEC, not 1099-MISC, for contractor services)
- Backup withholding entered if applicable
- Recipient's mailing address is current and complete
Compare totals against your books one last time
Finally, add up every form's total and compare that sum against your accounting software's total for 1099 tax filing-related payments for the year. A discrepancy here usually means you missed a contractor or double-entered one, and it's much faster to catch a math error now than to file a correction after the IRS has already processed your batch.
Step 6. Submit your forms and confirm acceptance
With your TINs verified and your review checklist complete, you're ready to actually transmit your batch. Submitting isn't the finish line, though. The IRS has to accept your forms before they're considered filed, and that distinction trips up a lot of first-time filers who close their browser the second they hit send.
Submit through your chosen platform
Hit submit on your batch through IRS IRIS, your commercial software, or your preparer's portal, and expect a brief processing window before you get a status update. IRIS typically returns a result within minutes for straightforward batches, though larger files can take longer to process. Commercial platforms often show a pending status too, so don't assume a form went through just because the upload finished. If you're filing through a 1099 tax filing service, the platform should notify you by email once each form clears IRS review, which saves you from logging back in repeatedly to check.
Save your confirmation and receipt ID
Once the system processes your batch, it generates a receipt ID or confirmation number tied to that specific submission. Save this documentation immediately, before you move on to anything else:
- Screenshot or PDF of the confirmation screen showing your receipt ID
- Date and time stamp of submission
- List of every form included in that batch, with recipient names
- Status result for each form (Accepted, Accepted with Errors, or Rejected)
A submission timestamp isn't proof of filing. Only an acceptance status protects you from a late-filing penalty.
Track status until it's fully accepted
Check back within 24 to 48 hours if any forms show a pending or processing status rather than a final result. "Accepted with Errors" means the IRS took the form but flagged something, usually a TIN mismatch, that you need to correct through an amended submission. "Rejected" means the form never counted as filed at all, so you're still on the hook for that recipient until you resubmit correctly. Handling 1099 tax filing online this carefully, tracking every form through to a clean acceptance, is what separates a filing that actually protects you from a penalty notice from one that just feels finished. Don't consider this step done until every single form in your batch shows accepted status, not just the batch as a whole.
Step 7. Deliver recipient copies and file state returns
Getting your forms accepted by the IRS only covers half the job. You still owe every contractor their own copy of the 1099, and depending on where you and your recipients live, you may owe a separate filing to your state's tax agency too. Skipping either step leaves you exposed to a penalty even after your federal 1099 tax filing shows accepted status.
Send recipient copies before the deadline
Contractors need their copy of the 1099-NEC by January 31, the same date as your federal filing deadline, so don't treat these as sequential tasks. Mail a printed copy or deliver it electronically if the contractor already agreed in writing to e-delivery, since the IRS requires that consent before you can skip paper entirely. Most 1099 tax filing software platforms and IRS IRIS both generate a printable recipient copy automatically once a form is accepted, so pull that PDF the same day you get your acceptance notice rather than waiting.
Recipient copies are due on the same day as your IRS filing. Treat them as one deadline, not two.
Check whether your state requires its own filing
Many states participate in the Combined Federal/State Filing (CF/SF) program, which forwards your federal data automatically so you don't file twice. Others require a direct state submission regardless of what the IRS already received. Before you close out this filing season, confirm your state's rule:
- California generally requires direct state filing for 1099-NEC, even when you've filed federally
- States with no income tax, like Texas or Florida, typically skip a separate 1099 filing requirement entirely
- States outside the CF/SF program need a standalone submission through their own tax portal
- Deadlines for state filing sometimes differ from the federal January 31 date, so check each state separately
Check the IRS Combined Federal/State Filing Program page to see which states participate before assuming your federal filing covers you everywhere your contractors live.
Keep proof of every delivery
Document how and when you sent each recipient copy, whether by certified mail or a delivery confirmation from your e-file platform. If a contractor claims they never received their form, this record protects you from a penalty tied to failure to furnish, which is separate from any penalty for late IRS filing.
Free vs. paid 1099 filing: costs, deadlines, and penalties
Cost is usually the first question freelancers ask, but it's the wrong one to lead with. Free 1099-NEC tax filing through IRS IRIS costs nothing if you're filing a handful of forms with clean TINs and no complications. The moment you're issuing more than a few forms, tracking backup withholding, or juggling multiple states, the time you spend troubleshooting a free platform often costs more than a paid 1099 tax filing service would have charged upfront.
What free filing actually gets you
IRS IRIS handles the core job well: it accepts your forms, generates recipient copies, and confirms acceptance status. What it doesn't do is flag misclassified workers, catch a TIN that's valid but attached to the wrong name, or file your state return automatically. Paid 1099 tax filing services typically bundle TIN matching, error checks, and Combined Federal/State Filing support into one submission, which matters most once you're filing for a growing contractor base rather than one or two people.
Free filing saves money upfront. Paid filing saves you from the correction notice that shows up three months later.
Deadlines you can't move
Regardless of which method you pick, the calendar doesn't change. Here's what to lock in:
| Deadline | Applies to |
|---|---|
| January 31 | 1099-NEC to recipients and the IRS |
| January 31 | 1099-NEC state filing (in most participating states) |
| February 28 | Paper filing for 1099-MISC (non-NEC) |
| March 31 | Electronic filing for 1099-MISC (non-NEC) |
What a missed deadline actually costs
Penalties scale with how late you file, and they apply per form, not per batch. Filing 30 days late runs about $60 per form, filing after August 1 jumps to roughly $130 per form, and intentional disregard removes the cap entirely, according to the IRS penalty guidance. Ten forms filed six months late can turn into a bill running well over $1,000 before interest. Weighing that against the cost of 1099 tax filing software or a preparer who guarantees on-time submission usually settles the free-versus-paid debate fast, especially once you've missed a deadline once and seen the notice yourself.
Getting your 1099 filing done right
Filing 1099s online isn't complicated once you know the sequence: gather your records, pick the right form, verify every TIN, and confirm acceptance before you call it done. Free tools like IRS IRIS work fine for a single clean form, but 1099 tax filing online gets riskier the moment you're juggling multiple contractors, backup withholding, or state filing rules that don't match the federal calendar. Most freelancers who've paid a $60 correction penalty once don't make that mistake twice.
Skipping any step, whether it's a TIN check or a recipient copy deadline, is how a simple filing turns into a notice you're dealing with in March. If you'd rather hand this off to someone who files these forms every day, our tax preparation services cover 1099-NEC, Schedule C, and small business filings for freelancers and contractors across California and beyond, with pricing that starts at $99 and no surprises once you're already in the middle of tax season.